Friday, June 22, 2012

Rebuild of a F25 daggerboard

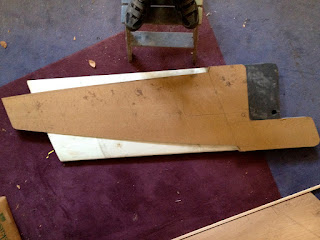
For my fellow trimaran owner/builder Per Folm Hansen I made an attempt to rebuild an older daggerboard to a High aspect shape that is Larry Wood that gave me the idea.


Here I stripped the old glass from the foam/wood core after cutting to the new shape.


I had to make a new carbonstringer that is build from normal and HD foam, then wrapped tight with two layer og 300 g/m 45/45 and infused with epoxy 


Assembly of the varius parts, a true 3d puzzle
Posted by Picasa

Tuesday, September 6, 2011

Mainsheet and gloves!!!

I got the Ronstan Carbon triple blocks for the mainsheet, just trying them out with some dyneema sk 75, this is for the big purchase, finetune is the same just a two block also with a cleat.

New gloves, great protection and good feeling.
People tend to use latex gloves.....LATEX MATERIAL IS NOT GOOD ENOUGH.......use nitril, and heavy duty if the job last for long or change gloves.

Here is the setup I use, white protection suit and gloves.

Monday, August 22, 2011

More update

Bow with HD for winch u-bolt.
Carbon tube for bowpole stay(?)
Daggerboard case with carbon stringers. The red color comes from the spray adhesive used to hold fabrics in place before infusion. I know of builders that use syntetic stamples but I dont find them here in DK, they can be found in the Nederlands but in large quantities >5000 .


Per Folm sold me some 7 mm Dynex Dux line and Colligo timples to make shrouds, so I made the modified Brummelsplice, very easy to do.


Wednesday, August 17, 2011

Summer update


Interior is ready to get boat out of the mold. Lots of firewood for the winter.....

Bottom of boat.


Filling holes and seams to infuse the bottom.

Deck infused, I choose to do it in two tempies, since working with the boat on the side makes it quite high.

Cockpit floor reinforced with layers of unicarbon both sides. An other layer of glass will be added once the stern is ready.
New roofing for the shed, the old one leaked a lot. This is a 15 mm plywood with prefitted tar roofing, self adhesive overlayes, quite smart, and very easy to install, thanks Jacob for the materials, and Grus for helping me.

Monday, March 28, 2011

Taping ancher well floor and forward bulkhead


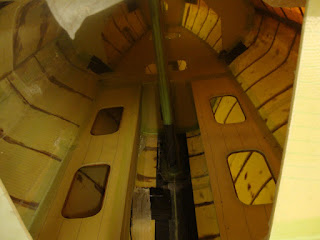
Hi there a note from the no-workspace-at-all department. I fitted the ancherwell floor in place before fitting the starboard side of the forward bulkhead. This mean that I was able to tape both the bottom and top of the plate in the watertight compartment. Plan origanally is to fit this floor from the top through the ancher hatch; so no proper taping of the bottom of the floor is possible. I had to fit the bulkhead after this difficult task was accomplished, and tape the bottom part of the bulkhead using a mirror to see that I was doing OK. I was taping through a 15 cm hole for a inspectionhatch. Below a shot from inside the watertight compartment that show the tape is fitted well. When I later do the ancherhatch I can do the remaining taping to floor and bulkhead. When taping difficult-to-reach-places, a good method is: apply a coat of resin to the joining pieces with a brush after the bog fillet is done. Wet out tape properly using brush, air roll and scraper on a table or piece of ply covered with plastic so no air is visible. Place tape over join, you can use a stick or spartel or whatever the situ calls for use imagination, use (long) brush/ cloved hand to remove air, maybe the alu roll, and last use peelply to make it stick and to make a surface that is almost ready for paint/filler. I even did upsidedown taping in the watertight compartment using two pieces instaed of one, makes it easier than one long that tends to fall down before you reach the far end. Giving a good coat of resin to the surface is an absolut must, dont be affraid to spend 25 g of resin on this. Also did some taping of deck and case with layers of unicarbon.