Tuesday, May 5, 2009
Aft cockpit seat and stern panel bagged
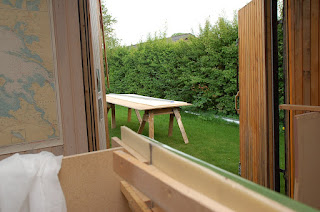
These parts are flat so I bag them on the big table. I use 400 gm2 inside and 600 gm2 outside.
I am quite surprised how many times I used these vacuum materials over and over . The bag is used at least 5 times. I cut a bag at least 20 cm larger than the table, so I can with a firm snap pull it away from the tacky tape. The tacky tape is protected from dirt when not in use with the same covering tape it came with. I take good care of this paper tape, since it is the best to pull off.
Also the release film can be reused, although this is a cheap material. Only the bleeder goes to the dump.
The panels can be a bit tricky to lift from the table. I found this tapered batten very use full, to push under the panels and lift them all over . This work especially well if some parts are very narrow, and fragile. Remember the epoxy is very long to gain full cure unless heat is used during bagging. I don't, I wait until parts are assembled.
Saturday, May 2, 2009
Deck Planked
Planking the front deck. It looks a bit dirty, I accidental walked on the planking. It will be removed when sanding bog later.
Deck/ foredeck transition,it curves just a bit.
Looking into the garden very nice, placed my moveable table out there. I cut the foam with an utility knife and a strait edge, much faster and easier than with the electric saw.
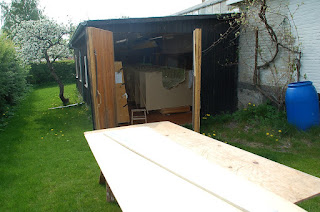
The boat shed viewed from the garden. That hedge needs cutting by the way ;-)
Last pieces (cockpit seat and stern decking) waiting for some epoxy, glass and vacuum.
I use almost everything, this is the scrap foam from the decking. I even thought about chopping it to powder and mix into the epoxy to use as bog.........
Hard to reach places are done with the extra head that came with the Festool drill. A great tool, but not cheap. I use it professional so not an issue.
Saturday, April 18, 2009
Laminating inside port hull
Flemming, Peter and Musse helped laminating inside.
Peelply is applied. We had a little trouble getting a prober vacuum, due to leaking seams. I think I will glue the overlaps of the seams in the future. It seems to me getting these seams airtight with just the bog from inside is hard to obtain.
It is most frustrating when I tried to make the seams as good as I can and that is not good enough. With the time running it is most important to get a good vacuum fast.
Also the bag had a small hole that was sealed with a bit of tacky tape.
Finally we got the vacuum good enough.
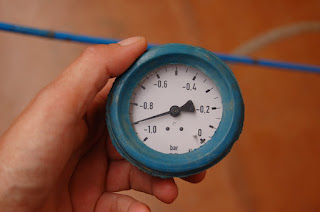
-0.9 bar is not perfect, but good enough for a tight laminate.
There were proberly more hidden small holes in the seams, that are difficult to seal since the stringers are in the way.
Peelply is applied. We had a little trouble getting a prober vacuum, due to leaking seams. I think I will glue the overlaps of the seams in the future. It seems to me getting these seams airtight with just the bog from inside is hard to obtain.
It is most frustrating when I tried to make the seams as good as I can and that is not good enough. With the time running it is most important to get a good vacuum fast.
Also the bag had a small hole that was sealed with a bit of tacky tape.
Finally we got the vacuum good enough.
-0.9 bar is not perfect, but good enough for a tight laminate.
There were proberly more hidden small holes in the seams, that are difficult to seal since the stringers are in the way.
Monday, March 9, 2009
Wednesday, February 25, 2009
Fitting top to beams
Fitting top is strait forward. Masking tape is set on an angle on each bulkhead and web and a lot of bog filled into these triangels. Also edges got a nice big round of bog. I use glassbubbles for this bog. When top is fitted it is turned upside down so bog can form a triangel to top.
It is not my favorite way of putting laminates together, but it seems like the only option here. I guess Mr. Farrier knows that this will be ok.
Fitting strut bearing to beams
I bought a complete folding set from Precourt Canada since do-it-yourself sometimes is not worth it. The finish and general standard of these fittings is very high, and it can be difficult to obtain materials in such small quantities and quality. In my opinion your time is better used building the boat. You would not build your own winches or would you??
The 4 bearings (on each beam) with bushes bought from Farrier Marine. And they fit perfect the Precourt fittings. This is a complete set of bushes from F-boat Store
The strut also needs a bush
Test fitting and drilling holes.
Checking device to make sure strut is in the middle. (Thanks Rod "Chillax" , F82R Melbourne, AUS, for the inspiration to this. )Care full mark is important, as well as enough bog, this time I use high density filler.
Done and cleaned.
A look inside beam.Approximate position just upside down
Sunday, February 22, 2009
Beams inside work
After a long wait I can get on with the beams. I need to cut open the drains i made in the bulkheads. There are 10 in each beams, so a good metod was needed: I first cut with the Fein cutter.It can cut pretty close. Damn good tool.
I clean up the hole with the strait grinder. This is also an excellent tool, and cheap to (Biltema for those readers living in Scandinavia). Works much better than the Dremel wannabees I tried.
I also had to install the end caps for the UPS pin. First cut to size, securely fastened, you cannot hold a carbon laminate this small size with your fingers. (oucch%&€#"!?§§)
The entry side is opened up to accept the pin (19 mm) Big drill needed!
Preinstall to see that all fits before messing with epoxy.
I needed a pulller to get the pin out. In the book Ian Farrier writes the pin should be able to rotate (yeah man with some force it will.)
The two caps are glued in place with the waxed pin in place. Also the plastic tube is fitted to prevent water enter the beam.
After the glue had cured I had to really blow the puller hard to get the pin out, even with several layers of wax.
Sunday, February 8, 2009
Bogging port hull
I use the Australian word, bog for this. The American/English word putty sounds like something you might eat..... Bog is a mix of epoxy and a filler, fillers can be wood dust, glass bobbles (very very small) micro balloons, silica and various others used in boat building.
For this purpose I use micro balloons a brownish powder.
First I cut the seams open with a sharp utility knife and for tricky places I use the pneumatic
Then using a candy bag I apply the bog two times with no sanding in between ( apply second layer in less than 12 hours).
Sanded and ready for laminate. Note the 5 cm edge of bog at the perimeter of the hull. This is for the vacuum tape. I do not trust that the foam will make a airtight glue with the tape, although other builder do without. But not much extra work to be sure.
For this purpose I use micro balloons a brownish powder.
First I cut the seams open with a sharp utility knife and for tricky places I use the pneumatic
straight router. It is like a Dremel tool, I chose this version since I burnt out a Dremel (a copy though) doing carbon fiber. The carbon got stuck in the bushings I believe.
Then using a candy bag I apply the bog two times with no sanding in between ( apply second layer in less than 12 hours).
Sanded and ready for laminate. Note the 5 cm edge of bog at the perimeter of the hull. This is for the vacuum tape. I do not trust that the foam will make a airtight glue with the tape, although other builder do without. But not much extra work to be sure.
Sunday, January 25, 2009
Lower port hull planked and HD inserts
The planking of the lower hull is now ready to fit HD inserts , short for high density ( hard foam 200 kg/m3). These pieces are used everywhere compression will occur, like fitting locations, but also along keel for trailering loads.
First I had to fit another batten on top to hold the extra foam, needed for vacuumtape.
Here I marked the two cutting lines for the keel HD, with this simple guide.
Cutting the foam out using a Fein cutter (this machine, I borrowed from a friend, is very usefull in a project like this)
Test fitting the HD strip.
Tuesday, January 20, 2009
Fitting foam on mainhull
Jess has been helping me before and I asked him to help fit the foam since when you are two persons, it is a lot easier and no screws on the inside is needed. As with the floats I cut the foam in 40 cm strips and route a shiplap each side (see feb. 2007 for detail). From frame 4 and forward we went to 30 cm strips since the bend is sharper at the keel.
We fasten a new strip in the middle and start hotforming the bottom part first (actualy it is the top but on the picture it looks like down!!!). As Jess is moving the heatgun I apply pressure and try to overbend it since it tends to springback a little. Proper heating is very importent since the holding power of the screws are poor. The strip has to be shaped to lay close to the battens as possible.
I
Foam is screwed from the outside. Jess is pressing the foam down as we go. Some places needs two or more screws to hold the foam.
Subscribe to:
Posts (Atom)