Tuesday, September 6, 2011

Mainsheet and gloves!!!

I got the Ronstan Carbon triple blocks for the mainsheet, just trying them out with some dyneema sk 75, this is for the big purchase, finetune is the same just a two block also with a cleat.

New gloves, great protection and good feeling.
People tend to use latex gloves.....LATEX MATERIAL IS NOT GOOD ENOUGH.......use nitril, and heavy duty if the job last for long or change gloves.

Here is the setup I use, white protection suit and gloves.

Monday, August 22, 2011

More update

Bow with HD for winch u-bolt.
Carbon tube for bowpole stay(?)
Daggerboard case with carbon stringers. The red color comes from the spray adhesive used to hold fabrics in place before infusion. I know of builders that use syntetic stamples but I dont find them here in DK, they can be found in the Nederlands but in large quantities >5000 .


Per Folm sold me some 7 mm Dynex Dux line and Colligo timples to make shrouds, so I made the modified Brummelsplice, very easy to do.


Wednesday, August 17, 2011

Summer update


Interior is ready to get boat out of the mold. Lots of firewood for the winter.....

Bottom of boat.


Filling holes and seams to infuse the bottom.

Deck infused, I choose to do it in two tempies, since working with the boat on the side makes it quite high.

Cockpit floor reinforced with layers of unicarbon both sides. An other layer of glass will be added once the stern is ready.
New roofing for the shed, the old one leaked a lot. This is a 15 mm plywood with prefitted tar roofing, self adhesive overlayes, quite smart, and very easy to install, thanks Jacob for the materials, and Grus for helping me.

Monday, March 28, 2011

Taping ancher well floor and forward bulkhead


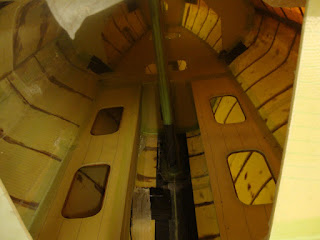
Hi there a note from the no-workspace-at-all department. I fitted the ancherwell floor in place before fitting the starboard side of the forward bulkhead. This mean that I was able to tape both the bottom and top of the plate in the watertight compartment. Plan origanally is to fit this floor from the top through the ancher hatch; so no proper taping of the bottom of the floor is possible. I had to fit the bulkhead after this difficult task was accomplished, and tape the bottom part of the bulkhead using a mirror to see that I was doing OK. I was taping through a 15 cm hole for a inspectionhatch. Below a shot from inside the watertight compartment that show the tape is fitted well. When I later do the ancherhatch I can do the remaining taping to floor and bulkhead. When taping difficult-to-reach-places, a good method is: apply a coat of resin to the joining pieces with a brush after the bog fillet is done. Wet out tape properly using brush, air roll and scraper on a table or piece of ply covered with plastic so no air is visible. Place tape over join, you can use a stick or spartel or whatever the situ calls for use imagination, use (long) brush/ cloved hand to remove air, maybe the alu roll, and last use peelply to make it stick and to make a surface that is almost ready for paint/filler. I even did upsidedown taping in the watertight compartment using two pieces instaed of one, makes it easier than one long that tends to fall down before you reach the far end. Giving a good coat of resin to the surface is an absolut must, dont be affraid to spend 25 g of resin on this. Also did some taping of deck and case with layers of unicarbon.

Tuesday, March 22, 2011

Fittting stem and HD inserts


More tool info, I bought this cutter, but the blades are expensive so I tried to weld a japanese blade to a base plate from a used blade seen at top. I can make 5 of these from one japanese blade and it cost a fraction of the original ones. Works great.

I had to straiten the port side a bit before gluing stem together. I fitted a strip of foam from the inside and another one on outside (no picture yet).

I plan to make a through hull carbon tube for the bowsprit bob stay instead of an U bolt or a carbon tang as used on the F22.
After glassing inside I fit a block of offcut foam pieces. The top of it consist of 4x15mm HD strips, the bottom is plain foam. All glued and shaped to fit the corner of stem.

Here it is glassed. Before I fitted it 2 layers of glass was laminated 1x800 and 1x400 g. Guess that will be strong enough.

For the trailer I went for the trad. Ubolt since I got it already. Here is the inside HD double strip glassed.

Monday, March 21, 2011

Bulkhead cutting and tools


I use a circular saw to cut strait lines using a guide that will cut right at the edge.


A jigsaw metal blade used for curved cuts.

Using an old template from the floats to support bulkhead while cutting.


Introducing RulleMarie (Rolling Marie) an old kitchen with wheels fitted. Here I use it for supporting mainbulkhead before glassing it.

Thursday, March 17, 2011

Bulkheads for starboard side.

I did not make bulk head for the starboard side ealier since I wanted to see if I got some left overs from planking and I did just enough to make all bulk heads I need without using a new sheet. I am short on foam and is saving as much as I can for interior cockpit etc. these will be larger pieces so it is nice to have full sheets at hand.


Bulheads just released from table, I used a plastic sheet instead of waxing the table it worked fine.
As before I mark the bulkhead before I glass it so I can cut it with peelply.

Joining main hull

I got help from some neighbours to carry the port half back into the shed and place it on starbordhalf. It fitted faily well, but had to make some small adjustments. Also there is a 0.5 cm gap at the entrance I cannot get rid off, so I bog it and forget about it.
Hull resting on blocks, alingning top half to the bottom.


I used the Menno way to attache the two half and it really works well, thanks Menno (actually I found the tip on Frams blog, so this blogging is quite helpfull). I fitted an extra stringer on outside tophalf with small wood blocks on inside overlapping the gap, they will keep edges alinged while the bog cures. Clamp outside stringers together by any means. Also I found I made a measure mistake, I made the uni layer on porthalf 55 cm to short, bummer... Can make an extra piece with plent overlap and say my prayers. Will do it when taping hull together.

Trying to close gap even with a tensioner around hull.

Old clamping trick in use. It is called " en ters" in danish boatbuilding where I come from. Very conveinent when you cannot reach with the clamp or there is no space for the foot as here.

Or you could buy a modern clamp that can even be reversed so it is pushing instead of pulling.
The clamping force of these are not great but for holding they are fine and one hand operated.

Wednesday, March 9, 2011

Daggerboard case install

Installed case using battens on inside to align to centerline.


Finished sheettrack backingplate. It looks a bit dry but that is ok I know there is enough resin used.

Tuesday, March 8, 2011

Laminated starboard deck


Crawling along inside adding peelply, I kneel on some layer of soft foam. Did all by myself and it went allright with slow hardener mixed with extra slow hardener 50/50%.

The glued bleeder and release film with some sprayglue, then only one sheet to handle.


Finished laminate, doing jibsheet track backing plate. Note I use vacuum not get it perfect, but to hold things in place since backingplace is beveled 45 degrees and that makes the laminete not easy to get right in corners.

Be sure you got first aid ready at hand, for those that do not read swedish it says: Instrument Surgical help department 1 set. And I got a backup box ;-)

And the faring goes on........more filling and more sanding, proberly overkill.

Monday, February 28, 2011

Fairing beams and prep. for vaccumbag deck

Mixing fairing compound for beams.

First coat applyed, and sanded, it is not an easy job fairing beams, and the netrails does not make it any easier. Apart from looking nice I dont believe there is any weight saving at all, originally Farrier calls for small alu plates inside beam for tapping screws into and U shaped fittings on outside. If I had know how much work went into fitting and fairing netrails I might have chosen U fittings. Buying premade beams may be expensive, but it is a huge time saver, do it if they are available for you prefered boat (F22 and F32). Apart from that it is quite fun to make the beams, such a complex part of the boat and folding system.

All set for vacuumbagging deck. I prepare everything as much as I can, cut all material, laminate, reinforments, peelply, slipfilm and bleeder (as an experiment I have sprayglued film and bleeder together so I can apply them as one, more on this later). Vacuumtape all around and bag sealed to one side with airline attached, so work is minimised once resin is mixed. Not that I am in a hurry, I use extra slow hardener, but if something is wrong I got time to fix it, typically a leak in the foam.

Saturday, February 26, 2011

Laminated starboard side


I forgot to post this picture but it shows hull after vacuum bagging inside laminate, including uni carbon strip along keel. Also I cut down the extra stringer at top so this side is ready for hull join.

Also you can see the to high no. 12, 13, 14 frames to the right, that I mentioned in previus post.